Saturday, December 20, 2014

{Tutorial} Sequins Leggings!


Who here is ready for the New Year!? It's coming right around the corner and odds are there's a party coming along with it. Save yourself the "but what do I wear??" drama and sew up these sparkly leggings!

Sequins not your style? Use this tutorial to make a two-toned version. Mix solid and print, two solids, or even add a stretch lace overlay! 

Just like the original Jocole Leggings pattern, this sequins modified version sews up fast, and makes a BIG impression! Let's get started:


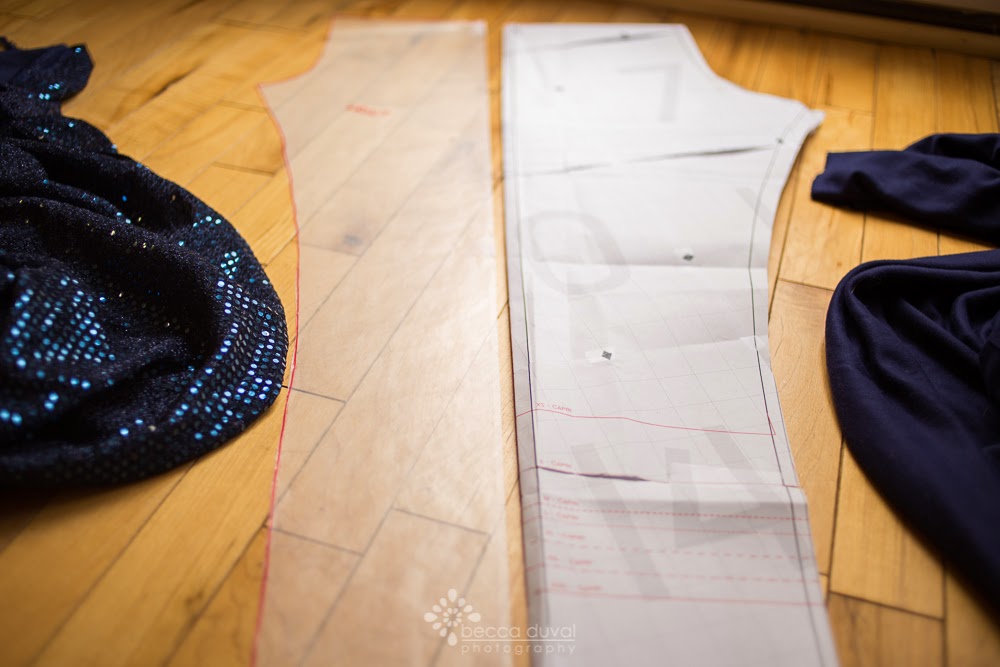
Grab your printed pattern piece, and get ready to see it in an all new light. See that line down the center?  Yup. There's been a built in two-tone-legging guide there this WHOLE TIME!

You can opt to cut along this line, and add your seam allowance while you're cutting fabric, or you can use wax paper like I'm about to to make two separate pattern pieces for this project. 


Unroll your wax paper over top the front half of the leggings pattern piece. Line up it's edge 3/8 inches past that guide line. This is our seam allowance. Grab your marker and trace along the pattern piece. 


Grab your pattern piece again, and mark 3/8 inches past the guide line again - towards the front of the legging this time. Fold along this new line, and now we'll have a back piece for our two tone leggings!


Cut 2 back, 2 front, and 2 front lining (if applicable).
 The sequins are attached to mesh, see-through fabric, and the whole thing is super itchy! So we'll spare ourselves that discomfort and cut a lining for the front sequins panels. 

Lay out your front pieces atop their respective linings:
Lining up along our side seam, lay your back piece on top of your front pieces (right sides together). Top stitch this seam towards the back.
Stitch these 3 layers along the inseam.


Now.. because our sequins fabric is itchy, we don't want to fold a traditional hem and have it scratch up our ankles. So grab your ruler and scissors and cut off 1 1/4 inches off the bottom. Keep these ends and bring them over to your cutting table.


Measure the length of your ends (measurement X), and cut (on the fold) two cuffs 3 inches tall by X. 


Stitch your cuffs on the short side and them fold in half, wrong-sides-together. 
Slide the cuff onto the end of your leggings, and clip or pin all raw edges together. 

Now refer to your pattern instructions for your last few steps (though for the same reasons we didn't hem the pant legs, I don't suggest doing the elastic-waist option. I'm partial to the yoga waistband anyway! Woop woop, built-in-girdle!) and meet me back here in two shakes of a lambs tail for a sequins legging dance!

Now wasn't that easy?? And you've got a glittery new wardrobe piece to rock on new years! Or while doing housework. Let's be honest. Shiny things make everything better :)

Here's a Gold/Black version I did a few weeks ago, and a gold/gold version I made for my daughter. What versions will you make??

Thursday, December 11, 2014

Peplum Sew Along Day 3

Peplum Sew Along

Day 3

Today is a quick sewing day.  The top of the shirt is complete, now let's add on the skirt.

Hem the bottom of the peplum.  Attach the skirt to the top and attach.


As my youngest daughter would say, woila!  Congratulations, you have completed the Peplum and have a new garment to add to your wardrobe!

Be sure to add your photos of your Peplum in the Jocole Facebook Group with the hashtag #jocolesewalong.  


Wednesday, December 10, 2014

Peplum Sew Along Day 2

Peplum Sew Along 

Day 2


Now that you have the fabric cut and ready to go, let's get started.  
  1. Sew the bodice front and back together at the shoulder seams.
  2. Finish neckline as desired.  My favorite method is using a neckband.
  3. Attach the sleeves.

  4.  Press the hem.
  5.  Sew the side seams of the top.

That's all for today.  Super simple, and fast!  See you tomorrow.


Monday, December 08, 2014

Peplum Sew Along

Peplum Sew Along

Day 1


It's here!  Time to sew the Peplum Top or Skater Dress.   I'll be sewing the Peplum Top, so let's get started.

Today you need to print and tape the pattern together and cut the fabric.  Be sure that the stretch of the fabric goes across the body.  My fabric is only 2 way stretch so I had to be careful about cutting the pattern the correct way.  You should have something similar to the photo below.


Tomorrow we start sewing so get ready to make an outfit for date night this weekend.

Sunday, December 07, 2014

Peplum Sew Along

Peplum Sew Along


Are you ready for a quick sew along?  The Peplum Top and Skater Skirt are such quick patterns, you can have a new outfit in just a couple of days (or if you do it all at once, just a few hours!).  I'm planning to make a holiday outfit with the Peplum as a sparkly top and Skinny Pants.  I hope you will join me!


Here is the schedule we will follow.  Grab some fabric and get ready!


Saturday, December 06, 2014

Peplum Coloring Page

Peplum Coloring Page


Is there anything better than a printable coloring page to go with a pdf sewing pattern?  You can download the coloring page for the Peplum Top and the Skater Skirt Add-on HERE.

Have you seen tester photos of the Peplum?  Well, they are adorable!


Can you believe?  Not only a girls pattern but also a women's pattern.

It even works for the teen crowd.


I love this pattern so much I want to make a sparkly, dressy one for my holiday parties.  So, let's get to work next week and have a sew along!  That's right, go get some fabric this weekend and lets sew a Peplum together.  Ready?  Go!

Merry and Bright

Merry and Bright

A Few of Our Favorite Things Holiday Blog Tour

Boy do I feel honored to be a part of a blog tour with some of my favorite designers.  I hope you will go visit each blog to see all of the amazing work these girls put into some gorgeous outfits.  There are also great new releases as well.


I am so excited about the release of the Girls Peplum Top and the Skater Add-On Pack for Girls and Ladies!  I can't even believe the release is here.


I am so happy that I have found another Jocole Dress that my oldest daughter really likes.  She is thrilled with the way her dress turned out and I am so happy she will actually wear something I made her.  

I love the fabric that Riley Blake sent me to use on these dresses.  I used the Christmas Basics line for the skirt, it's a woven fabric.  Yes, you can even use woven fabric with the Skater Dress!  That's pretty exciting!  I went up one size on the skirt and the fit was perfect.  


I also used the Houndstooth line for her belt.  I used the tutorial for the sash belt on the Jocole Blog, so easy.  I used Knit Basics for the pink top and I love the different fabrics together. 

This dress is probably one of my favorites!  I used RB Houndstooth Knit and I love it!  I was afraid the houndstooth was too big but I really am in love. 

You can purchase the Women's Peplum or Skater Skirt Add-on and the Girls Peplum and Skater Skirt Add-On here.


a Rafflecopter giveaway

Wednesday, December 03, 2014

{tutorial} Crossover Wrap Sweater

another fantastic guest tutorial from the amazing Becca Duval ... are you ready?  here she is ...

~ ~ ~ ~ ~ ~ ~
Who is ready to draft their own pattern piece!?

Aww now don't panic! If this is your first time combining or modifying pattern pieces, you'll be thrilled to see just how simple it can be!

What you'll need:
  1. Tape two pieces of wax paper together, each the length of your basic bodice+tee pattern. You should be able to fit both halves of the pattern pieces across. 
  2.  Lay wax paper overtop the bodice+tee pattern, and trace from the shoulder, down around the side, and across the bottom. Flip bottom piece, complete the trace across the bottom. So far so good, right?? Images below show the wax paper under the paper pieces so you can better read them.
  3. Grab your crossover piece. Match the inside shoulder seam and trace. We will improvise this line in a minute.
  4. Find and mark the narrowest part of the tee bottom. This is the waist. 
  5. On the side opposite the shoulder seam, draw a line straight down from the waist to the hem. 
  6. Now for our "improvising" step! Using your ruler, draw a line from the waist up to the crossover curve. 
  7. Your finished piece should look like the bottom image:


That wasn't so bad, was it?? Let's call this our "front pattern piece. "Now to cut our fabric! You'll need:
  • 2 Front pattern pieces, one mirror.
  • 2 Sleeves
  • 2 Ties (3 in x selvage-to-selvage)
  • 1 Neck Binding (6in x selvage-to-selvage)
  • 1 Back (basic tee bottom + basic empire back bodice)

Refer to any of the jocole pattern tutorials for diagrams and additional details on assembling shoulders and sleeves. 


Now we need to hem the remaining sides and bottom, as shown above. You can fold 1/4 and 1/2, or be a cheat like me and serge the raw ends, then turn 1/2 inch and stitch. 

Now let's measure down our neck binding! Grab it, your measure tape, and your scissors.


How long is the opening? Add 1 inch for seam allowances, and cut your binding to size. 

Have a bowl or other curved object around? Great! We'll need that. Or you can eyeball if you're feeling gutsy. Fold over the neck binding, then freehand a curve at the short ends. Start about 1.5 inch up from the long raw edges - we'll have to add our ties here.


Sew each tie piece into little tubes (first RST, then turn). They'll be a little unmanageable this way, but we will topstitch in a bit! Do NOT sew the short ends, we'll cut those down to size later.


Clip or pin the ties as shown, 1/2 inch up from the raw edge. Sew along the curve, back tacking at the ties for extra security. 

Stitch the neck binding RST across the opening. I knowwwww it looks ugly now, our top stitching will pretty it right up.


Now let's try it on! We need to measure down those ties. There's no button hole to feed the ties  through, but don't fret - this is a rather imperfect science. Your ties should wrap behind your bodies, around the side and tie in a loose, easy bow or knot at the front. What's left? Cut one of your ties at hip length. Now take off the sweater (that's already looking pretty schnazzy, might I add!) and cut the other tie to match. Fold the raw ends of the ties 1/2 inwards and pin.

Time to top stitch! Start at the center of the neck band/back bodice seam. Fold the raw edge inwards, and top stitch all around to the tie. Put the needle down, lift the presser foot, turn. (Do this at all corners.) Sew down the tie, across the tucked raw edges, back up the tie, and alllllll the way around to the other side, down THAT tie, and that folded raw end, back up the neck band/ back bodice seam and meet at our starting point. You just made one heck of a top stitch circle my friend! 

Those finished ties need a place to feed through when wrapped. Let's add a button hole!


Lay one front bodice piece down over top of the back bodice. Where the ties meet the side seam, mark a button hole the same size as the tie width. Take that puppy over to the machine and stitch your button hole!


Now hem (or add a cuff) to your sleeve, and proudly parade around in your completed wrap sweater!


Note on fabrics: The button hole - with certain machines, and certain light weight knits may prove problematic. I've used medium weight sweater knits and heavier weight ponte de roma. If you use thinner knits consider sewing the ties to the side-seam at the waist, so they don't need a button hold on the inside to wrap fully around the body.


There you have it! Your very own wrap sweater! Really - what *can't* we do with Jocole patterns?? 


Happy sewing!!